Luckylau's Blog

SpringBoot之MyBatis

什么是MyBatis?

​ MyBatis是一个支持普通SQL查询,存储过程和高级映射的优秀持久层框架。MyBatis消除了几乎所有的JDBC代码和参数的手工设置以及对结果集的检索封装。MyBatis可以使用简单的XML或注解用于配置和原始映射,将接口和Java的POJO(Plain Old Java Objects,普通的Java对象)映射成数据库中的记录。

orm工具的基本思想:

  1. 从配置文件(通常是XML配置文件中)得到 SqlSessionFactory
  2. 由SqlSessionFactory 产生 SqlSession
  3. 在SqlSession 中完成对数据的增删改查和事务提交等
  4. 在用完之后关闭SqlSession
  5. 在java 对象和 数据库之间有做mapping 的配置文件,也通常是xml 文件

​ 与Hibernate相比较,Hibernate鼓励使用实体对象(EntityObjects)和在其底层自动产生SQL语句,MyBatis框架接受SQL语句,而不是将其对开发人员隐藏起来,这样就可以充分利用数据库特有的特性并且可以准备自定义的查询。

​ 在性能方面, MyBatis支持数据库连接池,消除为每一个请求创建一个数据库连接的开销,同时提供了内建的缓存机制,在SqlSession级别提供了对SQL查询结果的缓存。

如何使用mybatis?

传统使用JDBC

假如我们创建一个对象,我们需要做的工作包括:创建一个连接,创建一个Statement对象,设置输入参数,关闭资源。

1
2
3
4
5
6
7
8
9
10
11
12
13
14
15
16
17
18
19
20
21
22
23
24
25
26
27
28
29
30
31
32
33
34
35
36
37
38
39
40
41
42
43
44
45
46
47
48
49
50
51
52
53
54
55
56
57
58
59
public class Student
{
private Integer studId;
private String name;
private String email;
private Date dob;
}
public void createStudent(Student student)
{
Connection conn = null;
try
{
//获得数据库连接
conn = getDatabaseConnection();
String sql = "INSERT INTO STUDENTS(STUD_ID,NAME,EMAIL,DOB)
VALUES(?,?,?,?)";
//创建 PreparedStatement
PreparedStatement pstmt = conn.prepareStatement(sql);
//设置输入参数
pstmt.setInt(1, student.getStudId());
pstmt.setString(2, student.getName());
pstmt.setString(3, student.getEmail());
pstmt.setDate(4, new
java.sql.Date(student.getDob().getTime()));
pstmt.executeUpdate();
}
catch (SQLException e)
{
throw new RuntimeException(e);
}
finally
{
//关闭连接
if(conn != null)
{
try
{
conn.close();
}
catch (SQLException e) { }
}
}
}
protected Connection getDatabaseConnection() throws SQLException
{
try
{
Class.forName("com.mysql.jdbc.Driver");
return DriverManager.getConnection("jdbc:mysql://localhost:3306/test",
"root",
"admin");
} catch (SQLException e)
{
throw e;
} catch (Exception e)
{
throw new RuntimeException(e.getCause());
}
}

单一使用Mybatis

为了简化和抽象上述jdbc的处理流程,mybatis是如下处理的。

首先配置文件,包括application.properties 和mybatis-config.xml。

1
2
3
4
jdbc.driverClassName=com.mysql.jdbc.Driver
jdbc.url=jdbc:mysql://localhost:3306/elearning
jdbc.username=root
jdbc.password=admin
1
2
3
4
5
6
7
8
9
10
11
12
13
14
15
16
17
<configuration>
<properties resource="application.properties"/>
<environments default="development">
<environment id="development">
<transactionManager type="JDBC"/>
<dataSource type="POOLED">
<property name="driver" value="${jdbc.driverClassName}"/>
<property name="url" value="${jdbc.url}"/>
<property name="username" value="${jdbc.username}"/>
<property name="password" value="${jdbc.password}"/>
</dataSource>
</environment>
</environments>
<mappers>
<mapper resource="com/mybatis3/mappers/StudentMapper.xml"/>
</mappers>
</configuration>

其次在\src\main\resources\com\mybatis3\mappers路径下,创建和配置StudentMapper.xml ,在\src\main\java\com\mybatis3\mappers路径下,创建接口StudentMapper.java

1
2
3
4
5
public interface StudentMapper
{
Student findStudentById(Integer id);
void insertStudent(Student student);
}
1
2
3
4
5
6
7
8
9
10
11
12
<mapper namespace="com.mybatis3.mappers.StudentMapper">
<resultMap type="Student" id="StudentResult">
<id property="studId" column="stud_id" />
<result property="name" column="name" />
<result property="email" column="email" />
<result property="dob" column="dob" />
</resultMap>
<insert id="insertStudent" parameterType="Student">
INSERT INTO STUDENTS(STUD_ID,NAME,EMAIL,DOB)
VALUES(#{studId },#{name},#{email},#{dob})
</insert>
</mapper>

最后代码实现

1
2
3
4
5
6
7
8
9
10
11
12
13
14
15
16
17
18
19
20
21
22
23
24
25
26
27
28
29
30
31
32
33
34
35
36
37
38
39
40
41
42
43
44
45
46
47
48
49
50
51
52
53
54
55
56
57
58
59
60
61
62
63
64
65
66
67
68
69
70
71
72
public class MyBatisSqlSessionFactory
{
private static SqlSessionFactory sqlSessionFactory;
private static final Properties PROPERTIES = new Properties();
static
{
try {
InputStream is = DataSourceFactory.class.getResourceAsStream("/application.properties");
PROPERTIES.load(is);
} catch (IOException e) {
e.printStackTrace();
}
}
public static SqlSessionFactory getSqlSessionFactory()
{
if(sqlSessionFactory==null)
{
InputStream inputStream = null;
try
{
inputStream = Resources.getResourceAsStream("mybatis-config.xml");
sqlSessionFactory = new SqlSessionFactoryBuilder().build(inputStream);
}catch (IOException e)
{
throw new RuntimeException(e.getCause());
}finally {
if(inputStream != null){
try {
inputStream.close();
} catch (IOException e) {
}
}
}
}
return sqlSessionFactory;
}
public static SqlSession getSqlSession()
{
return getSqlSessionFactory().openSession();
}
public static Connection getConnection()
{
String driver = PROPERTIES.getProperty("jdbc.driverClassName");
String url = PROPERTIES.getProperty("jdbc.url");
String username = PROPERTIES.getProperty("jdbc.username");
String password = PROPERTIES.getProperty("jdbc.password");
Connection connection = null;
try {
Class.forName(driver);
connection = DriverManager.getConnection(url, username, password);
} catch (Exception e) {
throw new RuntimeException(e);
}
return connection;
}
}
public void createStudent(Student student)
{
SqlSession sqlSession = MyBatisSqlSessionFactory.getSqlSession();
try {
StudentMapper studentMapper = sqlSession.getMapper(StudentMapper.class);
studentMapper.insertStudent(student);
sqlSession.commit();
} finally {
sqlSession.close();
}
}

下面详细讲解如何配置Mybatis。

通过XML配置Mybatis
1
2
3
4
5
6
7
8
9
10
11
12
13
14
15
16
17
18
19
20
21
22
23
24
25
26
27
28
29
30
31
32
33
34
35
36
37
38
<?xml version="1.0" encoding="UTF-8" ?>
<!DOCTYPE configuration
PUBLIC "-//mybatis.org//DTD Config 3.0//EN"
"http://mybatis.org/dtd/mybatis-3-config.dtd">
<!-- 配置文件的根元素 -->
<configuration>
<!-- 属性:定义配置外在化 -->
<properties></properties>
<!-- 设置:定义mybatis的一些全局性设置 -->
<settings>
<!-- 具体的参数名和参数值 -->
<setting name="" value=""/>
</settings>
<!-- 类型名称:为一些类定义别名 -->
<typeAliases></typeAliases>
<!-- 类型处理器:定义Java类型与数据库中的数据类型之间的转换关系 -->
<typeHandlers></typeHandlers>
<!-- 对象工厂 -->
<objectFactory type=""></objectFactory>
<!-- 插件:mybatis的插件,插件可以修改mybatis的内部运行规则 -->
<plugins>
<plugin interceptor=""></plugin>
</plugins>
<!-- 环境:配置mybatis的环境 -->
<environments default="">
<!-- 环境变量:可以配置多个环境变量,比如使用多数据源时,就需要配置多个环境变量 -->
<environment id="">
<!-- 事务管理器 -->
<transactionManager type=""></transactionManager>
<!-- 数据源 -->
<dataSource type=""></dataSource>
</environment>
</environments>
<!-- 数据库厂商标识 -->
<databaseIdProvider type=""></databaseIdProvider>
<!-- 映射器:指定映射文件或者映射类 -->
<mappers></mappers>
</configuration>

其中settings属性可以配置如下:

设置参数 描述 默认值
cacheEnabled 该配置影响的所有映射器中配置的缓存的全局开关 true
lazyLoadingEnabled 延迟加载的全局开关。当开启时,所有关联对象都会延迟加载。 特定关联关系中可通过设置fetchType属性来覆盖该项的开关状态 false
aggressiveLazyLoading 当启用时,对任意延迟属性的调用会使带有延迟加载属性的对象完整加载;反之,每种属性将会按需加载。 true
multipleResultSetsEnabled 是否允许单一语句返回多结果集(需要兼容驱动)。 true
useColumnLabel 使用列标签代替列名。不同的驱动在这方面会有不同的表现, 具体可参考相关驱动文档或通过测试这两种不同的模式来观察所用驱动的结果。 true
useGeneratedKeys 允许 JDBC 支持自动生成主键,需要驱动兼容。 如果设置为 true 则这个设置强制使用自动生成主键,尽管一些驱动不能兼容但仍可正常工作(比如 Derby)。 False
autoMappingBehavior 指定 MyBatis 应如何自动映射列到字段或属性。 NONE 表示取消自动映射;PARTIAL 只会自动映射没有定义嵌套结果集映射的结果集。 FULL 会自动映射任意复杂的结果集(无论是否嵌套)。 PARTIAL
defaultExecutorType 配置默认的执行器。SIMPLE 就是普通的执行器;REUSE 执行器会重用预处理语句(prepared statements); BATCH 执行器将重用语句并执行批量更新。 SIMPLE
defaultStatementTimeout 设置超时时间,它决定驱动等待数据库响应的秒数。 Not Set (null)
1
2
3
4
5
6
7
8
9
10
11
12
13
14
15
16
<settings>
<setting name="cacheEnabled" value="true"/>
<setting name="lazyLoadingEnabled" value="true"/>
<setting name="multipleResultSetsEnabled" value="true"/>
<setting name="useColumnLabel" value="true"/>
<setting name="useGeneratedKeys" value="false"/>
<setting name="autoMappingBehavior" value="PARTIAL"/>
<setting name="defaultExecutorType" value="SIMPLE"/>
<setting name="defaultStatementTimeout" value="25"/>
<setting name="defaultFetchSize" value="100"/>
<setting name="safeRowBoundsEnabled" value="false"/>
<setting name="mapUnderscoreToCamelCase" value="false"/>
<setting name="localCacheScope" value="SESSION"/>
<setting name="jdbcTypeForNull" value="OTHER"/>
<setting name="lazyLoadTriggerMethods" value="equals,clone,hashCode,toString"/>
</settings>

其中plugins做一个详细的分析和介绍。

首先在mybatis中要使用插件你必须实现:org.apache.ibatis.plugin.Interceptor接口

1
2
3
4
5
6
7
package org.apache.ibatis.plugin;
import java.util.Properties;
public interface Interceptor {
public Object intercept(Invocation invctn) throws Throwable;
public Object plugin(Object o);
public void setProperties(Properties prprts);
}

​ MyBatis允许你在已映射的语句执行过程中的某一点进行拦截调用。默认情况下,Mybatis允许使用插件来拦截的方法调用包括:Executor(update,query,flushStatements,commit,rollback,getTransaction,close,isClosed)

1
2
3
4
5
6
7
8
9
10
11
12
13
14
15
16
17
18
public interface Executor {
ResultHandler NO_RESULT_HANDLER = null;
int update(MappedStatement ms, Object parameter) throws SQLException;
<E> List<E> query(MappedStatement ms, Object parameter, RowBounds rowBounds, ResultHandler resultHandler, CacheKey cacheKey, BoundSql boundSql) throws SQLException;
<E> List<E> query(MappedStatement ms, Object parameter, RowBounds rowBounds, ResultHandler resultHandler) throws SQLException;
<E> Cursor<E> queryCursor(MappedStatement ms, Object parameter, RowBounds rowBounds) throws SQLException;
List<BatchResult> flushStatements() throws SQLException;
void commit(boolean required) throws SQLException;
void rollback(boolean required) throws SQLException;
CacheKey createCacheKey(MappedStatement ms, Object parameterObject, RowBounds rowBounds, BoundSql boundSql);
boolean isCached(MappedStatement ms, CacheKey key);
void clearLocalCache();
void deferLoad(MappedStatement ms, MetaObject resultObject, String property, CacheKey key, Class<?> targetType);
Transaction getTransaction();
void close(boolean forceRollback);
boolean isClosed();
void setExecutorWrapper(Executor executor);
}

ParameterHandler(getParameterObejct,setParameters)

1
2
3
4
5
public interface ParameterHandler {
Object getParameterObject();
void setParameters(PreparedStatement ps)
throws SQLException;
}

ResultSetHandler(handlerResultSets,handlerOutputParameters)

1
2
3
4
public interface ResultSetHandler {
<E> List<E> handleResultSets(Statement stmt) throws SQLException;
<E> Cursor<E> handleCursorResultSets(Statement stmt) throws SQLException;
void handleOutputParameters(CallableStatement cs) throws SQLException;

StatementHandler(prepare,parameterize,batch,update,query)

1
2
3
4
5
6
7
8
9
10
11
12
13
14
15
16
public interface StatementHandler {
Statement prepare(Connection connection, Integer transactionTimeout)
throws SQLException;
void parameterize(Statement statement)
throws SQLException;
void batch(Statement statement)
throws SQLException;
int update(Statement statement)
throws SQLException;
<E> List<E> query(Statement statement, ResultHandler resultHandler)
throws SQLException;
<E> Cursor<E> queryCursor(Statement statement)
throws SQLException;
BoundSql getBoundSql();
ParameterHandler getParameterHandler();
}

在实际开发中,Executor范围最大 ,其次StatementHandler,最后ParameterHandler 和 ResultSetHandler。ResultSetHandler很少使用,StatementHandler最常用,范围大于ParameterHandler。例如需要拦截加入参数,用范围越小的ParameterHandler越好,当然也可以用StatementHandler。

以分页为例:http://blog.csdn.net/ykzhen2015/article/details/51746568

通过Java API配置MyBatis

创建SqlSessionFactory

1
2
3
4
5
6
7
8
9
10
11
12
13
14
15
16
17
18
19
20
21
22
23
24
25
public static SqlSessionFactory getSqlSessionFactory()
{
SqlSessionFactory sqlSessionFactory = null;
try
{
DataSource dataSource = DataSourceFactory.getDataSource();
TransactionFactory transactionFactory = new
JdbcTransactionFactory();
Environment environment = new Environment("development",
transactionFactory, dataSource);
Configuration configuration = new Configuration(environment);
configuration.getTypeAliasRegistry().registerAlias("student",
Student.class);
configuration.getTypeHandlerRegistry().register(PhoneNumber.
class, PhoneTypeHandler.class);
configuration.addMapper(StudentMapper.class);
sqlSessionFactory = new SqlSessionFactoryBuilder().
build(configuration);
}
catch (Exception e)
{
throw new RuntimeException(e);
}
return sqlSessionFactory;
}

获得DataSource对象

1
2
3
4
5
6
7
8
9
10
public static DataSource getDataSource()
{
String driver = "com.mysql.jdbc.Driver";
String url = "jdbc:mysql://localhost:3306/test";
String username = "root";
String password = "admin";
PooledDataSource dataSource = new PooledDataSource(driver, url,
username, password);
return dataSource;
}

配置typeAliases

1
configuration.getTypeAliasRegistry().registerAlias("Student",Student.class);

注册typeHandlers

1
configuration.getTypeHandlerRegistry().register(PhoneNumber.class, PhoneTypeHandler.class);

设置Settings

1
2
3
4
5
6
7
8
9
10
11
12
13
14
15
16
17
18
19
configuration.setCacheEnabled(true);
configuration.setLazyLoadingEnabled(false);
configuration.setMultipleResultSetsEnabled(true);
configuration.setUseColumnLabel(true);
configuration.setUseGeneratedKeys(false);
configuration.setAutoMappingBehavior(AutoMappingBehavior.PARTIAL);
configuration.setDefaultExecutorType(ExecutorType.SIMPLE);
configuration.setDefaultStatementTimeout(25);
configuration.setSafeRowBoundsEnabled(false);
configuration.setMapUnderscoreToCamelCase(false);
configuration.setLocalCacheScope(LocalCacheScope.SESSION);
configuration.setAggressiveLazyLoading(true);
configuration.setJdbcTypeForNull(JdbcType.OTHER);
Set<String> lazyLoadTriggerMethods = new HashSet<String>();
lazyLoadTriggerMethods.add("equals");
lazyLoadTriggerMethods.add("clone");
lazyLoadTriggerMethods.add("hashCode");
lazyLoadTriggerMethods.add("toString");
configuration.setLazyLoadTriggerMethods(lazyLoadTriggerMethods );

注册Mapper XML文件

1
configuration.addMapper(StudentMapper.class);

Spring整合Mybatis

​ 正如前面描述如果你只使用MyBatis而没有使用Spring,在每一个方法中,我们需要手动创建SqlSessionFactory对象,并且从SqlSessionFactory对象中创建SqlSession。而且我们还要负责提交或者回滚事务、关闭SqlSession对象。

​ 通过使用MyBatis-Spring模块,我们可以在Spring的应用上下文ApplicationContext中配置MyBatis Beans,Spring会负责实例化SqlSessionFactory对象以及创建SqlSession对象,并将其注入到DAO或者Service类中。并且,你可以使用Spring的基于注解的事务管理功能,不用自己在数据访问层中书写事务处理代码了。

1
2
3
4
5
6
7
8
9
10
<dependency>
<groupId>org.mybatis</groupId>
<artifactId>mybatis</artifactId>
<version>3.2.8</version>
</dependency>
<dependency>
<groupId>org.mybatis</groupId>
<artifactId>mybatis-spring</artifactId>
<version>1.3.0</version>
</dependency>

首先配置 applicationContext.xml ,包括dataSource,sqlSessionFactory和Dao(采用扫描形式注入)

1
2
3
4
5
6
7
8
9
10
11
12
13
14
15
16
17
18
19
20
21
22
23
24
25
26
27
28
29
30
31
32
33
34
35
36
37
38
39
40
41
42
43
44
45
46
47
48
49
50
51
52
<?xml version="1.0" encoding="UTF-8"?>
<beans xmlns="http://www.springframework.org/schema/beans"
xmlns:xsi="http://www.w3.org/2001/XMLSchema-instance"
xsi:schemaLocation="http://www.springframework.org/schema/beans http://www.springframework.org/schema/beans/spring-beans-3.0.xsd">
<!--配置数据源-->
<bean name="dataSource" class="com.alibaba.druid.pool.DruidDataSource"
init-method="init" destroy-method="close">
<property name="url" value="${jdbc_url}" />
<property name="username" value="${jdbc_username}" />
<property name="password" value="${jdbc_password}" />
<!-- 初始化连接大小 -->
<property name="initialSize" value="0" />
<!-- 连接池最大使用连接数量 -->
<property name="maxActive" value="20" />
<!-- 连接池最小空闲 -->
<property name="minIdle" value="0" />
<!-- 获取连接最大等待时间 -->
<property name="maxWait" value="60000" />
<property name="validationQuery" value="${validationQuery}" />
<property name="testOnBorrow" value="false" />
<property name="testOnReturn" value="false" />
<property name="testWhileIdle" value="true" />
<!-- 配置间隔多久才进行一次检测,检测需要关闭的空闲连接,单位是毫秒 -->
<property name="timeBetweenEvictionRunsMillis" value="60000" />
<!-- 配置一个连接在池中最小生存的时间,单位是毫秒 -->
<property name="minEvictableIdleTimeMillis" value="25200000" />
<!-- 打开removeAbandoned功能 -->
<property name="removeAbandoned" value="true" />
<!-- 1800秒,也就是30分钟 -->
<property name="removeAbandonedTimeout" value="1800" />
<!-- 关闭abanded连接时输出错误日志 -->
<property name="logAbandoned" value="true" />
<!-- 监控数据库 -->
<!-- <property name="filters" value="stat" /> -->
<property name="filters" value="mergeStat" />
</bean>
<!--配置sqlSessionFactory对象-->
<bean id="sqlSessionFactory" class="org.mybatis.spring.SqlSessionFactoryBean">
<!-- 配置MyBatis全局配置文件:MyBatis-config.xml -->
<property name="configLocation" value="classpath:mybatis-config.xml"/>
<!-- 注入数据库连接池 -->
<property name="dataSource" ref="dataSource"/>
<!-- 扫描sql配置文件:mapper需要的xml文件 -->
<property name="mapperLocation" value="classpath:mapper/*.xml"/>
<!-- 配置数据库表对应的java实体类 -->
<property name="typeAliasesPackage" value="com.klm.po" />
</bean>
<!--配置扫描Dao接口包-->
<bean class="org.mybatis.spring.mapper.MapperScannerConfigurer">
<property name="basePackage" value="com.klm.dao"/>
<property name="sqlSessionFactoryBeanName" value="sqlSessionFactory"/>
</bean>

再次配置mybatis的配置文件mybatis-config.xml,除了去掉environment标签,其他没啥区别。

SpringBoot整合Mybatis

1
2
3
4
5
6
7
8
9
10
11
12
13
14
15
<dependency>
<groupId>org.mybatis.spring.boot</groupId>
<artifactId>mybatis-spring-boot-starter</artifactId>
<version>1.1.1</version>
</dependency>
<dependency>
<groupId>mysql</groupId>
<artifactId>mysql-connector-java</artifactId>
<version>5.1.21</version>
</dependency>
<dependency>
<groupId>com.alibaba</groupId>
<artifactId>druid</artifactId>
<version>1.0.18</version>
</dependency>

application.properties

1
2
3
4
spring.datasource.url=jdbc:mysql://localhost:3306/test
spring.datasource.username=root
spring.datasource.password=123456
spring.datasource.driver-class-name=com.mysql.jdbc.Driver

举一个简单例子

1
2
3
4
5
6
7
8
9
10
11
12
13
14
15
16
17
18
19
20
21
22
23
24
25
26
27
28
29
30
31
32
33
34
35
36
37
38
39
40
41
42
43
44
45
46
47
48
49
50
51
52
53
54
package org.spring.springboot;
import javax.sql.DataSource;
import org.mybatis.spring.SqlSessionFactoryBean;
import org.mybatis.spring.annotation.MapperScan;
import org.apache.ibatis.session.SqlSessionFactory;
import org.apache.log4j.Logger;
import org.springframework.boot.SpringApplication;
import org.springframework.boot.autoconfigure.EnableAutoConfiguration;
import org.springframework.boot.autoconfigure.SpringBootApplication;
import org.springframework.boot.context.properties.ConfigurationProperties;
import org.springframework.context.annotation.Bean;
import org.springframework.core.io.support.PathMatchingResourcePatternResolver;
import org.springframework.jdbc.datasource.DataSourceTransactionManager;
import org.springframework.transaction.PlatformTransactionManager;
@SpringBootApplication
@MapperScan("com.klm.dao")
@EnableAutoConfiguration
public class Application {
private static Logger logger = Logger.getLogger(Application.class);
@Bean
@ConfigurationProperties(prefix="spring.datasource")
public DataSource dataSource() {
return new org.apache.tomcat.jdbc.pool.DataSource();
}
@Bean
public SqlSessionFactory sqlSessionFactoryBean() throws Exception {
SqlSessionFactoryBean sqlSessionFactoryBean = new SqlSessionFactoryBean();
sqlSessionFactoryBean.setDataSource(dataSource());
PathMatchingResourcePatternResolver resolver = new PathMatchingResourcePatternResolver();
sqlSessionFactoryBean.setMapperLocations(resolver.getResources("classpath:/mybatis/*.xml"));
return sqlSessionFactoryBean.getObject();
}
@Bean
public PlatformTransactionManager transactionManager() {
return new DataSourceTransactionManager(dataSource());
}
public static void main(String[] args) {
// 程序启动入口
// 启动嵌入式的 Tomcat 并初始化 Spring 环境及其各 Spring 组件
SpringApplication.run(Application.class,args);
}
}

如何使用generator生成配置信息?

首先pom.xml配置中添加:

1
2
3
4
5
6
7
8
9
10
11
12
13
14
15
16
17
18
19
20
21
<build>
<plugins>
<plugin>
<groupId>org.mybatis.generator</groupId>
<artifactId>mybatis-generator-maven-plugin</artifactId>
<version>1.3.5</version>
<dependencies>
<dependency>
<groupId>mysql</groupId>
<artifactId>mysql-connector-java</artifactId>
<version>5.1.39</version>
</dependency>
</dependencies>
<configuration>
<!--配置文件的路径-->
<configurationFile>${basedir}/src/main/resources/generatorConfig.xml</configurationFile>
<overwrite>true</overwrite>
</configuration>
</plugin>
</plugins>
</build>

然后在${basedir}/src/main/resources/路径下加入generatorConfig.xml

1
2
3
4
5
6
7
8
9
10
11
12
13
14
15
16
17
18
19
20
21
22
23
24
25
26
27
28
29
30
31
32
33
34
35
36
37
38
39
40
41
42
43
44
45
46
47
48
49
50
51
52
53
54
55
56
57
58
59
60
61
62
63
64
65
66
67
68
69
70
71
72
73
74
75
76
77
78
79
80
81
82
83
84
85
86
87
88
89
90
91
92
93
94
95
96
97
98
99
100
101
102
103
104
105
106
107
108
109
110
111
112
113
114
115
116
117
118
119
120
121
122
123
124
125
126
127
128
129
130
131
132
133
134
135
136
137
138
139
140
141
142
<?xml version="1.0" encoding="UTF-8"?>
<!DOCTYPE generatorConfiguration
PUBLIC "-//mybatis.org//DTD MyBatis Generator Configuration 1.0//EN"
"http://mybatis.org/dtd/mybatis-generator-config_1_0.dtd">
<generatorConfiguration>
<context id="generatorTables" targetRuntime="MyBatis3">
<!-- 自动识别数据库关键字,默认false,如果设置为true,根据SqlReservedWords中定义的关键字列表;
一般保留默认值,遇到数据库关键字(Java关键字),使用columnOverride覆盖
-->
<property name="autoDelimitKeywords" value="false"/>
<!-- 生成的Java文件的编码 -->
<property name="javaFileEncoding" value="UTF-8"/>
<!-- 格式化java代码 -->
<property name="javaFormatter" value="org.mybatis.generator.api.dom.DefaultJavaFormatter"/>
<!-- 格式化XML代码 -->
<property name="xmlFormatter" value="org.mybatis.generator.api.dom.DefaultXmlFormatter"/>
<commentGenerator>
<!-- 这个元素用来去除指定生成的注释中是否包含生成的日期 false:表示保护 -->
<!-- 如果生成日期,会造成即使修改一个字段,整个实体类所有属性都会发生变化,不利于版本控制,所以设置为true -->
<property name="suppressDate" value="true" />
<!-- 是否去除自动生成的注释 true:是 : false:否 -->
<property name="suppressAllComments" value="false" />
</commentGenerator>
<!--数据库链接URL,用户名、密码 -->
<jdbcConnection driverClass="com.mysql.jdbc.Driver"
connectionURL="jdbc:mysql://localhost/springbootdb" userId="root" password="root123">
</jdbcConnection>
<javaTypeResolver>
<!-- This property is used to specify whether MyBatis Generator should
force the use of java.math.BigDecimal for DECIMAL and NUMERIC fields, -->
<!--
true:使用BigDecimal对应DECIMAL和 NUMERIC数据类型
false:默认,
scale>0;length>18:使用BigDecimal;
scale=0;length[10,18]:使用Long;
scale=0;length[5,9]:使用Integer;
scale=0;length<5:使用Short;
-->
<property name="forceBigDecimals" value="false" />
</javaTypeResolver>
<!-- java模型创建器,是必须要的元素
负责:1,key类(见context的defaultModelType);2,java类;3,查询类
targetPackage:生成的类要放的包,真实的包受enableSubPackages属性控制;
targetProject:目标项目,指定一个存在的目录下,生成的内容会放到指定目录中,如果目录不存在,MBG不会自动建目录
-->
<!-- 生成模型的包名和位置 -->
<javaModelGenerator targetPackage="org.spring.springboot.domain" targetProject="src/main/java">
<!-- for MyBatis3/MyBatis3Simple
自动为每一个生成的类创建一个构造方法,构造方法包含了所有的field;而不是使用setter;
-->
<!--<property name="constructorBased" value="false"/>-->
<!-- 在targetPackage的基础上,根据数据库的schema再生成一层package,最终生成的类放在这个package下,默认为false -->
<property name="enableSubPackages" value="false" />
<!-- for MyBatis3 / MyBatis3Simple
是否创建一个不可变的类,如果为true,
那么MBG会创建一个没有setter方法的类,取而代之的是类似constructorBased的类
-->
<!--<property name="immutable" value="false"/>-->
<!-- 设置一个根对象,
如果设置了这个根对象,那么生成的keyClass或者recordClass会继承这个类;在Table的rootClass属性中可以覆盖该选项
注意:如果在key class或者record class中有root class相同的属性,MBG就不会重新生成这些属性了,包括:
1,属性名相同,类型相同,有相同的getter/setter方法;
-->
<!--<property name="rootClass" value="com._520it.mybatis.domain.BaseDomain"/>-->
<!-- 设置是否在getter方法中,对String类型字段调用trim()方法 -->
<property name="trimStrings" value="true" />
</javaModelGenerator>
<!-- 生成映射文件的包名和位置 -->
<sqlMapGenerator targetPackage="mapper" targetProject="src/main/resources">
<!-- 在targetPackage的基础上,根据数据库的schema再生成一层package,最终生成的类放在这个package下,默认为false -->
<property name="enableSubPackages" value="true" />
</sqlMapGenerator>
<!-- 对于mybatis来说,即生成Mapper接口,注意,如果没有配置该元素,那么默认不会生成Mapper接口
targetPackage/targetProject:同javaModelGenerator
type:选择怎么生成mapper接口(在MyBatis3/MyBatis3Simple下):
1,ANNOTATEDMAPPER:会生成使用Mapper接口+Annotation的方式创建(SQL生成在annotation中),不会生成对应的XML;
2,MIXEDMAPPER:使用混合配置,会生成Mapper接口,并适当添加合适的Annotation,但是XML会生成在XML中;
3,XMLMAPPER:会生成Mapper接口,接口完全依赖XML;
注意,如果context是MyBatis3Simple:只支持ANNOTATEDMAPPER和XMLMAPPER
-->
<!-- 生成DAO的包名和位置 -->
<javaClientGenerator type="XMLMAPPER" targetPackage="org.spring.springboot.dao" targetProject="src/main/java">
<!-- 在targetPackage的基础上,根据数据库的schema再生成一层package,最终生成的类放在这个package下,默认为false -->
<property name="enableSubPackages" value="false" />
<!-- 可以为所有生成的接口添加一个父接口,但是MBG只负责生成,不负责检查
<property name="rootInterface" value=""/>
-->
</javaClientGenerator>
<!-- 要生成哪些表 -->
<!-- 选择一个table来生成相关文件,可以有一个或多个table,必须要有table元素
选择的table会生成一下文件:
1,SQL map文件
2,生成一个主键类;
3,除了BLOB和主键的其他字段的类;
4,包含BLOB的类;
5,一个用户生成动态查询的条件类(selectByExample, deleteByExample),可选;
6,Mapper接口(可选)
tableName(必要):要生成对象的表名;
注意:大小写敏感问题。正常情况下,MBG会自动的去识别数据库标识符的大小写敏感度,在一般情况下,MBG会
根据设置的schema,catalog或tablename去查询数据表,按照下面的流程:
1,如果schema,catalog或tablename中有空格,那么设置的是什么格式,就精确的使用指定的大小写格式去查询;
2,否则,如果数据库的标识符使用大写的,那么MBG自动把表名变成大写再查找;
3,否则,如果数据库的标识符使用小写的,那么MBG自动把表名变成小写再查找;
4,否则,使用指定的大小写格式查询;
另外的,如果在创建表的时候,使用的""把数据库对象规定大小写,就算数据库标识符是使用的大写,在这种情况下也会使用给定的大小写来创建表名;
这个时候,请设置delimitIdentifiers="true"即可保留大小写格式;
可选:
1,schema:数据库的schema;
2,catalog:数据库的catalog;
3,alias:为数据表设置的别名,如果设置了alias,那么生成的所有的SELECT SQL语句中,列名会变成:alias_actualColumnName
4,domainObjectName:生成的domain类的名字,如果不设置,直接使用表名作为domain类的名字;可以设置为somepck.domainName,那么会自动把domainName类再放到somepck包里面;
5,enableInsert(默认true):指定是否生成insert语句;
6,enableSelectByPrimaryKey(默认true):指定是否生成按照主键查询对象的语句(就是getById或get);
7,enableSelectByExample(默认true):MyBatis3Simple为false,指定是否生成动态查询语句;
8,enableUpdateByPrimaryKey(默认true):指定是否生成按照主键修改对象的语句(即update);
9,enableDeleteByPrimaryKey(默认true):指定是否生成按照主键删除对象的语句(即delete);
10,enableDeleteByExample(默认true):MyBatis3Simple为false,指定是否生成动态删除语句;
11,enableCountByExample(默认true):MyBatis3Simple为false,指定是否生成动态查询总条数语句(用于分页的总条数查询);
12,enableUpdateByExample(默认true):MyBatis3Simple为false,指定是否生成动态修改语句(只修改对象中不为空的属性);
13,modelType:参考context元素的defaultModelType,相当于覆盖;
14,delimitIdentifiers:参考tableName的解释,注意,默认的delimitIdentifiers是双引号,如果类似MYSQL这样的数据库,使用的是`(反引号,那么还需要设置context的beginningDelimiter和endingDelimiter属性)
15,delimitAllColumns:设置是否所有生成的SQL中的列名都使用标识符引起来。默认为false,delimitIdentifiers参考context的属性
注意,table里面很多参数都是对javaModelGenerator,context等元素的默认属性的一个复写;
-->
<table tableName="user" domainObjectName="User" mapperName="UserDao"
enableCountByExample="false" enableUpdateByExample="false"
enableDeleteByExample="false" enableSelectByExample="false"
selectByExampleQueryId="false"></table>
</context>
</generatorConfiguration>

这里我们没有加入自己实现的插件,也就是在中无法解析

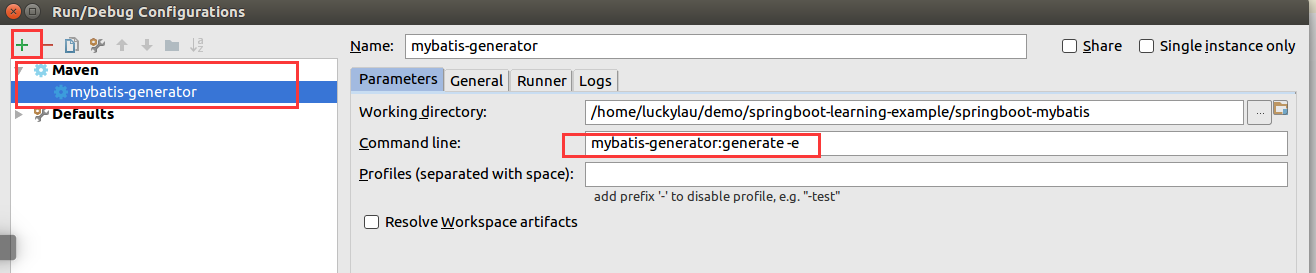
最后运行,我使用idea配置的,这里加了“-e ”选项是为了让该插件输出详细信息,这样可以帮助我们定位问题。

深入理解mybatis的原理?

参考Mybatis系列文章

参考:

深入理解mybatis原理

http://blog.csdn.net/column/details/mybatis-principle.html

generator 下载地址

https://github.com/mybatis/generator

springboot整合mybatis源码

https://github.com/mybatis/spring-boot-starter

Mybatis学习博客

http://limingnihao.iteye.com/blog/781671

Mybatis官方博客

http://www.mybatis.org/mybatis-3/zh/index.html

Mybatis 实战教程

http://blog.csdn.net/techbirds_bao/article/details/9233599/

MyBatis xml配置文件详解

http://blog.csdn.net/summer_yuxia/article/details/53169227

MyBATIS插件原理

http://blog.csdn.net/ykzhen2015/article/details/50312651

spring与mybatis三种整合方法

https://www.cnblogs.com/wangmingshun/p/5674633.html

Maven项目中Spring整合Mybatis

https://www.cnblogs.com/ljdblog/p/5842778.html

基于SpringBoot + Mybatis实现SpringMVC Web项目

http://7player.cn/2015/08/30/%E3%80%90%E5%8E%9F%E5%88%9B%E3%80%91%E5%9F%BA%E4%BA%8Espringboot-mybatis%E5%AE%9E%E7%8E%B0springmvc-web%E9%A1%B9%E7%9B%AE/

附录:

修改内容 时间
2017-11-12 初始化
2017-11-18 重新架构内容
2017-11-21 完成如何使用mybatis章节
2017-11-23 完成如何使用generator
Luckylau wechat
如果对您有价值,看官可以打赏的!